A few practical guidelines will help make watering plants more efficient, while helping them grow successfully.
- Create furrows or wide basins around plants so water will soak into the root zone.
- Control weeds frequently. They steal valuable moisture and nutrients that should go to your plants.
- Use organic mulches to increase retention of moisture in the soil and to keep roots cooler during hot weather. (See Mulching to Save Water.)
- Apply water in early morning or evening hours during summer for highest water pressure and to minimize loss through evaporation.
- Install automatic watering systems where possible for regulated applications by drip emitters, bubblers or pop-up sprinklers.
- Make it a habit to adjust automatic irrigation clocks monthly. Increase or decrease the amount of water applied as water needs change with the seasons.
- Don’t operate sprinklers during windy periods (winds tend to be more prevalent in the afternoon). Winds blow water away from the plants you want to irrigate and cause it to evaporate more rapidly.
- Light hand sprinkling from a hose on shrubs, trees and vines does little good. Soak the soil deeply at the drip line.
- The appearance of green algae on the soil surface indicates too much water is being applied. This often occurs in late summer or fall as temperatures cool. Reduce water applied, and check for leaks in irrigation system.
How much and how often do you need to water landscape plants in the Coachella Valley? This is a common question asked by many desert gardeners, particularly by newcomers. Answering this two-part question is complex: Drying winds, soils that drain fast, soils that drain slow, and the wide range of water requirements of the many plants that grow here impact how much and when to water. For example, established natives and desert-adapted plants need much less water than tropical or subtropical shrubs and trees, shallow-rooted annuals, non-native perennials, ground covers and lawns. Other factors play important roles, such as competition for water from the roots of nearby shrubs and trees, age of plants, time of year, and exposure to the sun, including reflected heat from buildings and streets.
Lush tropical plants may require daily watering during the summer and twice weekly during the winter. Even low to moderate water users may need irrigation every other day during the summer, depending on the water-holding capacity of the soil.
Succulent plants, including cacti, do well without regular watering. Established cactus gardens can survive with hand watering from a garden hose two to four times a year, depending on rainfall. Speaking of rainfall, some years no measurable rain falls in the Coachella Valley! Generally, monthly or bimonthly watering through the summer is appreciated by even the most drought-tolerant plants.
The water needs of plants are also dependent on the cultivar of a species, where it was originally native to, and the genetics of the individual plant. Even with these many variables, there are good general guidelines to follow.
Plants and Their Day-to-Day Water Needs
Soil type has a great impact on how much and how often to water plants. And one of the toughest aspects of watering plants properly in the Coachella Valley is that the soils can be extremely variable, even within a single home lot. All cove and dune areas in the valley have soils that are well drained and retain little water. The best water-holding soils exist along the Whitewater Stormwater Channel from Rancho Mirage to Indio, in the lower cove of La Quinta, in the Indio and Coachella areas and most of the lower valley. In some areas, soils may actually be poorly drained, and certain plants will not thrive there.
Plant roots absorb water from the soil. Water is carried up to the leaves, drawn as water moves out into the drier outer air through microscopic pores in the leaves. Plants can lose massive amounts of water through their leaves (transpiration). In one study, an 8 foot-high corn plant transpired 150 gallons of water in a single day.
Plants will "tell" you when they need water by lackluster color, and drooping, curling leaves. It is better to water before they reach this stage to avoid major stress.
Plants lose most of their water between noon and 4 in the afternoon. Roots absorb water day and night but, on a hot day, transpiration through the leaves may exceed absorption through the roots. If the loss is great, plants show their distress by wilting, but they often recover. If enough moisture exists in the soil, moisture content in the leaves will return to normal at night. If water loss is too great, it can cause the plant to suffer damage or even cause its death.
Plants start photosynthesis even before the sun breaks over the horizon, so early morning is the best time of day to water them. Watering early or late at night also gets water into the soil without undue loss through evaporation due to higher, midday temperatures.
Watering in early morning or late evening also has the added benefit of higher water pressure. The greatest demand on public water systems is between 8 a.m. and 8 p.m. Sprinklers work at peak efficiency when water demand is at its lowest—later in the evening or early morning. For plants susceptible to mildew, such as roses and lawns, morning watering is best: Leaves become dry before nightfall.
Deep soaking trees, shrubs, palms and vines, young or old, helps them develop deep root systems. Deeper, wider, more extensive roots will have access to reservoirs of moisture in the soil. Access to this moisture is important during extended hot or dry conditions, which place extra demand on the plants.
Water should be applied at the plant’s drip line. This is an imaginary area located at the outer perimeter of the plant. Picture where rain would naturally drip off of the leaves to the ground. It is here that the plant has its water-absorbing roots, or feeder roots. Near the trunk, you want to encourage development of strong anchoring roots. Watering deep and wide has an added benefit. Trees and shrubs with an extensive root system are not as easily blown over by strong, gusty winds.
To meet the needs of the plants and to save on water bills, water should be applied to the soil slowly so that it can soak in deeply. As mentioned, this encourages deep rooting, with roots well below the hot surface soil. A drip irrigation system on an automatic timer becomes a valuable tool to making this irrigation program come to life.
Using Technology to Tell How Much and When to Water
Computer technology applied to current local weather conditions is available to help the home gardener irrigate precisely, replacing plant moisture loss.
Developed and operated by the California Department of Water Resources primarily for agricultural irrigation, the California Irrigation Management Information System (CIMIS) is especially helpful to provide information on lawn irrigation. A home computer is not necessary, although it could make the information more useful.
Evapotranspiration (ET)
A computer in Sacramento regularly polls more than 100 automatic weather stations throughout the state, including the Coachella Valley. It records local weather data such as temperature, relative humidity, dew point, wind speed, soil temperature, rainfall and net radiation. The computer stores the accumulated data and calculates hourly a reference figure for the total amount of water a plant needs to maintain itself. This evapotranspiration (ET) rate varies by plant type.
A quick definition: Evapotranspiration is a process where plants open their pores and thus transpire water. The transpired water evaporates, which helps cool the plant. The evaporation action also physically helps pull more water into the leaves. The plant must open its pores to get the carbon dioxide it needs to make its food.
Precise figures for many landscape plants have not yet been calculated, but the reference ET, or ET°, provides a good starting point.
If the daily reference ET is known, calculate the daily irrigation need. You can then program irrigation system automatic controllers to deliver that amount.
Moisture stress—replacing less moisture than ET losses—can cause plants to temporarily stop growing. By irrigating established plants at 80 percent of ET, the homeowner can mow and prune less frequently without injuring plants. They will grow about 50 percent less rapidly. Irrigating at less than 80 percent will cause plants described in this book as high-water users to weaken and decline, becoming more susceptible to disease and pests.
Fruit trees and vegetable gardens should always be irrigated at 100 percent of the ET rate. Less than 100 percent and the quality and quantity of vegetables and fruit harvested will be greatly diminished.
CIMIS Computer
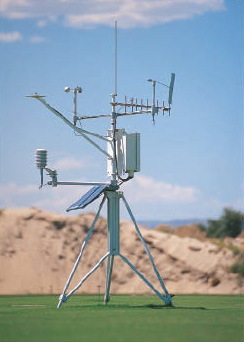
A CIMIS station gathers local weather information and sends it to Sacramento for analysis. This information is then distributed to local irrigators.
CIMIS information can be accessed on to the Coachella Valley Water District website at www.cvwd.org. Even without computer access, the National Weather Service makes the information accessible by announcing local ET information every day on KIG 78, the Coachella Valley weather radio station (162.4 MHz). Inexpensive radios that receive only the weather station are also available in electronics stores. If you do not have a weather radio or internet access, you can call to hear the CVWD’s taped weather forecast at (760) 398-7211, or (760) 345-3711.
Designing a Water-Efficient
Irrigation System
Irrigation systems are available for every type of landscape. A drip irrigation system is best for areas that contain shrubs and trees. An automatic pop-up sprinkler system is a must for efficient lawn watering. Extensive beds of flowers or ground covers as well as vegetable gardens can be watered by drip emitters or bubblers. An automatic timer regulating the irrigation system(s) is optimal for savings and convenience. Gardeners and plants greatly benefit from automated irrigation systems.
Overall, drip irrigation is considered the best system for most sections of the landscape. It slowly and precisely places water in the root zone on a regular basis to encourage proper growth and healthy plants. Only the root zone is irrigated, and little water is wasted on open spaces between plants. This reduces water loss to evaporation by as much as 60 percent. As an added bonus, the home gardener's maintenance workload is reduced simply because there is less moist soil surface to sprout weeds.
The first step in designing your own irrigation system is to evaluate your landscape. Draw a map of your lot, including existing plants. Graph paper, with one square equaling a unit of measurement, works well. Make several copies of this master layout. On one copy, draw in plants you want to add to the landscape. If you have an existing irrigation system, draw that on your map as well.
Next, define separate watering zones. Each zone should consist of plants with similar water requirements, from low to very high. Irrigation zones are based on how often the plants need to be watered, as well as typical soil depth for their roots. Actual gallon amounts applied is not a concern at this stage.
The average automatic irrigation control “timer” has space for six zones, which is usually more than enough for the average home landscape.
Typically, Zone One includes trees and large shrubs that need infrequent, yet slow, deep irrigation. Zone Two usually includes small shrubs, perennials, vines and other plants that need regular irrigation. Zone Three and Zone Four could be for a vegetable garden or lawn—areas watered every day in summer. Zone Five could be for plants in containers on the patio, which require irrigation every day via a drip system. Zone Six may be ground cover or flowerbeds, irrigated with bubblers or multihead “spider head” drip irrigation.
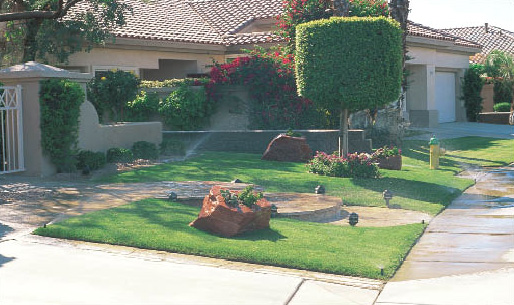
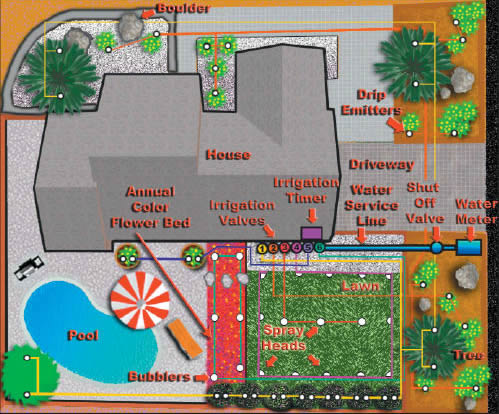 Overhead view of an efficient, zoned irrigation system layout. For more information, see Get in the Zone.
As you begin to plan (and then install) an irrigation system, it’s helpful to learn some terminology. Next, you will need to walk through the steps required to install the components to see how they fit together. Last, you will have to go back to the zoned lot plan you created to figure out which and how many water delivery devices you will need to install for the different plant zones or gardens you have on site.
Before you start installing your irrigation system, it’s a good idea to become familiar with irrigation terms. This is true even if you will have an irrigation professional do the installation for you. This knowledge will help insure that the work performed meets your needs and is installed properly.
Stores that specialize in irrigation supplies can offer valuable assistance to the do-it-yourselfer. Most are willing to provide expert advice, and they carry a wide range of the specialty parts you’ll require. Because they are in business for professionals, they carry quality equipment that is standardized and interchangeable.
Home-improvement and hardware stores usually do not offer the same quality of service or variety of parts as specialty stores. They sell prepackaged systems with detailed written instructions. It is wise to purchase well-known brands. Often the equipment of unknown brands is substandard. Additionally, components of an economy brand often cannot be interchanged with those of other manufacturers. Once a system is installed, it is important to have a dependable source of parts for replacement and expansion.
Even professionals have to visit the irrigation supply store more than once during the installation of a major project. They often run out of this or that fitting. Do not be embarrassed by multiple trips to the store. Ideally, if you plan properly you’ll have more than enough of all you need. Likewise, don’t be shy about overbuying and then returning excess. Keep in mind, too, that it’s helpful to have a few extras of everything on hand for future maintenance and repairs.
The following terms are loosely grouped by the type of service they perform. As mentioned, become familiar with as many of these terms as possible.
Zone—Group of sprinklers that operate together and are controlled by the same control valve. Also called a station.
Pipe—Polyethylene tubing and PVC (polyvinyl chloride) are the two most commonly used types of irrigation pipe. Both types include UV resistant compounds, and both can last up to 20 years.
Pipe comes in various diameters. As a general rule, homeowners should install irrigation lines that are 1/2-inch diameter. Hose bibs are generally made of 1/2-inch pipe, although water typically comes into the home in 3/4-inch pipe.
PVC is a rigid pipe generally used for commercial applications and lawn systems. Pipes are cut with a saw and linked using fittings and a special glue.
Polyethylene is a soft, flexible pipe or tubing, most commonly used for drip systems. Once only available in black, it is now available in a variety of colors, which makes is easy to identify which tubing is delivering water to different zones.
Polyethylene can be cut with pruning shears or a polyethylene cutting tool. Sections are then linked with compression fittings or compression couplings that are simple to press into place.
Fittings—Pieces of pipe are connected with various fittings. Common fittings include 45- and 90-degree elbows, “T” connectors and straight connectors (to connect two pieces of pipe). Special adapters are available that link different types of pipe, such as PVC pipe with polyethylene pipe, which happens on occasion.
Microtubing—Used in drip irrigation, this narrow diameter tubing delivers water from polyethylene pipe to the drip emitters. It is attached to polyethylene pipe with barbed connectors.
Holes for the microtube connectors are punched using a specialized punch tool that is purchased when you buy your other supplies. Purchase a number of “goof-plugs” at the same time. Use them to close any holes made in the wrong spot on the polyethylene pipe, or to plug microtubes that are no longer in use.
Water Delivery Devices—Lawns are irrigated with sprinklers. Trees, shrubs and other plants can be irrigated with drip emitters or bubblers. Sprayers and misters can also be part of an irrigation system in special situations.
Drip Emitter—In a drip irrigation system, an emitter, also called a dripper, slowly releases the water. Available in button or flag devices, some of the newer, self-cleaning flags are a worthwhile option in areas with hard water (See Maintaining and Troubleshooting your Irrigation System.)
| Irrigation Guide for Trees, Shrubs and Ground Covers in the Coachella Valley | ||||||||||||
| Trees & Shrubs | Jan. | Feb. | Mar. | Apr. | May | June | July | Aug. | Sept. | Oct. | Nov. | Dec. |
| *High | 45 | 56 | 53 | 59 | 60 | 59 | 59 | 57 | 63 | 52 | 44 | 42 |
| *Med. | 31 | 35 | 33 | 38 | 39 | 38 | 38 | 37 | 41 | 33 | 28 | 28 |
| *Low | 14 | 21 | 16 | 17 | 18 | 18 | 18 | 17 | 18 | 16 | 14 | 14 |
| Gallons per day for established trees and large shrubs (15 to 20 feet high and as wide) | ||||||||||||
| Ground covers | Jan. | Feb. | Mar. | Apr. | May | June | July | Aug. | Sept. | Oct. | Nov. | Dec. |
| *High | 2.4 | 2.8 | 2.8 | 3.1 | 3.0 | 3.1 | 3.1 | 3.0 | 3.2 | 2.8 | 2.3 | 2.1 |
| *Med. | 1.8 | 1.9 | 1.8 | 2.0 | 2.0 | 2.0 | 2.0 | 2.1 | 1 | 1.8 | 1.6 | 1.4 |
| *Low | .7 | .9 | .9 | 1.0 | .9 | .9 | .9 | .9 | 1.0 | .9 | .7 | .7 |
| Gallons per day for small shrubs and ground covers | ||||||||||||
| Irrigation Days per Week | ||||||||||||
| 2 | 3 | 4 | 5 | 6 | 7 | 7 | 6 | 5 | 4 | 3 | 2 | |
*Plants are categorized as high, medium or low water use in Success with Desert Plants. To calculate how long to water with a drip system, divide the gallonage ratings of your emitters into the gallons per irrigation day times 60 minutes. For example, a 1-gallon emitter on a plant requiring 8 gallons per cycle: multiply 8x60 divided by 1 for a required irrigation time of 480 minutes, or 8 hours. Large trees naturally require more and larger emitters. Four 2-gallon emitters would apply the same amount of water in one hour as a single 1-gallon emitter in 8 hours. |
||||||||||||
Emitters are rated by the gallons per hour (GPH) of water that they deliver. Select emitters that deliver an appropriate GPH depending on your plant needs and soil type. (See chart above.) In sandy soil, it’s helpful to release water for shorter but more frequent periods. Clay soils do not drain rapidly so can accept lower GPH emitters but with longer running times. Note: It is possible to mix emitters with different GPH on a single zone line.
Non-Compensating Emitters—These emitters have a set flow rate at a given pressure and are used on level ground.
Compensating Emitters—Use where there are elevation extremes of more than 10 feet. They produce a nearly constant flow rate regardless of changes in water line pressure.
In-Line Drippers—A type of drip emitter that is placed in a long continuous line of microtube. Useful in vegetable gardens, flowerbeds or for ground covers. These slowly emit water to soil around plant roots, and use less water than bubblers or sprinklers.
Multi-Head—Part of a drip system that allows 6, 8 or 12 lines of microtubing to come out of a single, central location. Used in planting beds or with ground covers. Also called an octopus or spider-head.
Bubblers—Water bubbles downward, rather than sprinkling. Use to water planter beds by slowly flooding the bed, or place them near individual plants according to the plant’s gallons-per-minute requirement. Often used to water trees that prefer flood irrigation, such as citrus. Also rated in gallons per hour, and available as adjustable or non-adjustable.
Adjustable Bubbler—Higher quality devices require a tool to set or adjust the flow (generally a Phillips head screwdriver). Check for a wide range of flow adjustments, debris filters and set flow adjustments that hold.
Nonadjustable Bubbler—More tamper resistant than adjustable types. Check for availability of several flow models, pressure compensation and debris screens.
Microspray Head—Emits water in a spray diameter around the head. These were once popular for ground cover beds. However, they have proven to be inefficient, with a large percentage of water applied lost to evaporation. For a more modern irrigation system that is more efficient, replace microsprayers with multi-heads and drip emitters or bubblers.
Mister—A type of emitter that sends out a mist of water. Used especially in greenhouses that need to maintain high humidity, or occasionally on patios for plants that require high humidity.
Porous Hose—Also called soaker hose. These hoses can be attached to irrigation pipe via a fitting called a hose adapter. Porous hose allows water to ooze through a series of minute channels in the hose along its entire surface. The soil is thus watered the entire length of the hose and to a width that depends on soil type and amount of time irrigated. It is a good option for vegetable gardens and flowerbeds.
Irrigation Tape—Used in commercial agriculture, and can be used in home vegetable gardens. It is a specially constructed, thin-walled drip pipe that has holes placed every few inches to discharge water. Lay down an irrigation tape for each row of planting. Install on the soil surface or bury one or two inches deep.
Sprinklers—A wide range of types are available, with a variety of techniques used to disperse water through the air to the targeted garden location. A great percentage of water applied can be lost to evaporation by using sprinklers.
Pop-Up Sprinkler—Irrigation device that will pop up out of an underground housing to water an area, then descend into the housing once watering is over. Sprinkler heads with plastic components and with pop-down springs are currently popular but have a shorter life expectancy than the older style constructed of brass or other metal.
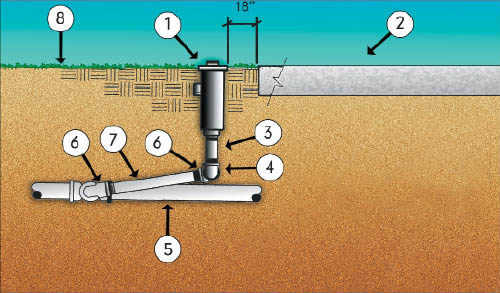 Pop-Up Spray Head Design
1. Pop-up Spray Head, 2. Walk or Curb, 3. PVC Schedule 80 Nipple(4" minimum length), 4. PVC TxT 90 Degree Ell, 5. Lateral Line Pipe & Fitting, 6. Marlex 90 Degree Street Ell, 7. PVC Schedule 80 Nipple (6" long), 8. Finish Grade
A pop-up height of 3 to 4 inches is ideal for lawn. Check for debris screens to reduce clogging. Heads are available in several nozzle patterns and radii (color-coded ones are preferred). These provide coverage to small irregular areas. Low-angle nozzles are recommended for windy locations.
Pop-Up Rotor—A form of pop-up sprinkler that will cast the water in a rotating circle. It can be set to sprinkle in a 360- degree circle, or as little as a 90-degree arc.
End Cap—Every irrigation zone (line) requires an individual end cap. By removing this cap, you can clean the line out after installing the system—before first use. Clean out all the dirt, sand and debris in the line that can clog emitters or sprinklers. End caps should also be opened periodically so lines can be flushed clean.
Backflow Preventer—A device that prevents the water in the irrigation system from siphoning back into drinking water. In some regions, ordinances require installation of backflow preventers. Also called anti-siphon valve.
Filter—All irrigation systems need some type of filter to keep dirt and debris from clogging the emitters. Look for one that comes apart easily for its quarterly cleaning. Some stores sell fertilizer tablets that can be placed inside the filter. Do not use these because they lead to salt build-up and clog the drip emitters.
Emergency Shut Off—Necessary to allow you to shut off water to the irrigation system in case of an emergency. It is recommended the irrigation system be installed on a separate water line stubbed off of the main water line that goes into your home.
Shut-Off Valves—These can be either a gate valve, which functions like a water faucet, or a ball valve, which rotates 90 degrees to close a ball inside the pipe. Ball valves are preferred, and are less likely to break down or freeze up over time.
Pressure Regulator—A device that maintains steady water pressure within your lines. One must be installed in each zone. Pressure regulators insure that surges in water pressure do not rupture lines or blow emitters off the tubing. Pressure regulators are rated by the pounds per square inch (PSI) of water pressure they permit. Generally a 20 PSI regulator is ideal for a home landscape. Depending on the type of lawn sprinklers you use, you may need a higher PSI. Also if you need to apply water up a slope from where your valves are located, you may need a higher PSI, as well as pressure-compensating emitters.
This chart shows the average number of minutes a grass lawn typically needs water each day. Watering times can vary significantly based on sprinkler efficiency and soil conditions. Reduce watering times gradually to determine the proper amount needed for your lawn.
| Month | Spray Heads | Rotary Heads |
| January | 4 | 9 |
| February | 6 | 15 |
| March | 9 | 21 |
| April | 12 | 27 |
| May | 15 | 33 |
| June | 17 | 38 |
| July | 16 | 38 |
| August | 15 | 33 |
| September | 12 | 28 |
| October | 9 | 19 |
| November | 5 | 13 |
| December | 4 | 7 |
Pressure Gauge—Used in commercial applications, and not generally required by the homeowner. Water in desert regions often contains minerals or salts that can build up over time. A pressure gauge, installed downstream from both the filter and pressure regulator, lets you know when it’s time to clean the filter. Regular quarterly (every three months) cleaning of the filter and flushing lines eliminates the need for this device.
Automatic Controller—Functions to control the watering cycle by sending a signal to the control valve(s) to open or close on the days and times you pre-select. You program the controller and direct it when, how long and how often to water plants. For outdoor installation, check for a gasket-sealed door and a sturdy case that can be locked. Also called a timer.
Weather-based controllers adjust automatically according to weather conditions, eliminating the need for the homeowner to adjust water output each month.
Features to check for: A battery or other backup to retain the irrigation program during power failure; two to three start times per program per day; up to 6 hours run time per zone; 21-day calendar or programmable day intervals and rainy day shutoff. Another desirable feature is remote access by modem or radio, programmable to use ET data from CIMIS.
Electro-mechanical Controller—An older style controller that runs only one zone (valve). Generally uses “pins” to trigger start and stop times. Irrigation supply stores usually have pins available.
Features to check for: Minimum 3-minute cycle for spray heads; maximum 6-hour cycle for drip; 21-day calendar.
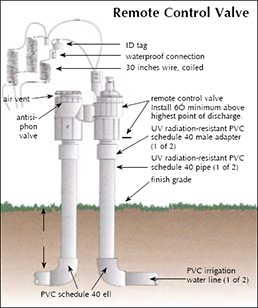
Valves—Valves can be automatic or manual. One option is to have manually operated valves for each zone. You simply turn the valve on when plants in that zone need water. Also called control valve. If you convert to low-water-use plants throughout your landscape, a manual valve is an inexpensive option. This is because many desert-adapted plants need only a periodic deep soak once every three weeks or so in summer. Many require no water once (they are established) in winter.
Valves are generally made of durable plastic. For commercial applications, brass is more expensive but recommended. Also, brass is preferred if valves will not be sheltered in a housing. (See below.)
Automatic Valves—These are electrically operated by the controller. The low-voltage electricity comes from the controller into a solenoid on the valve that “tells” the valve to open or close. Purchase valves with a back-up manual option. This allows you to operate the valve even if the controller or solenoid are not functioning.
Features to check for: Emergency shut-off; manual override; replaceable solenoid assembly.
Valve Housing—Valves are generally placed in protective housings, which can be either above or below ground. It is best to decide which works best for you and your landscape before you visit the store. Underground housings have a much nicer appearance and are much less obtrusive, yet access to valves makes it more difficult to work on them in case of malfunction. Valve housings were once available only in green. They come in other colors that blend better in the landscape, including a desert tan.
Atmospheric Breaker Valve—A type of valve required in landscapes that include lawn. Allows the water to bleed back out of the line and allows the pop-up sprinklers used to irrigate the lawn to drop back down into their housings. Once these were the only type of valves available, and depending on the store, may still be the only type. The atmospheric breaker capability is not required for drip lines.
Manifold—Term used to cover a number of valves placed near one another, possibly because the entire apparatus appears similar to the exhaust manifold of an automobile engine. Also called valve manifold.
Mainline—Water line from water source to the valve assembly. A mainline is usually PVC pipe.
Zoneline—Water line from the valve assembly and extending around a particular zone. Generally, PVC pipe is used for lawn zones and polyethylene pipe is used for all other irrigation zones.
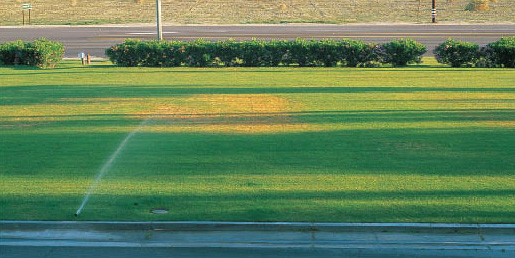
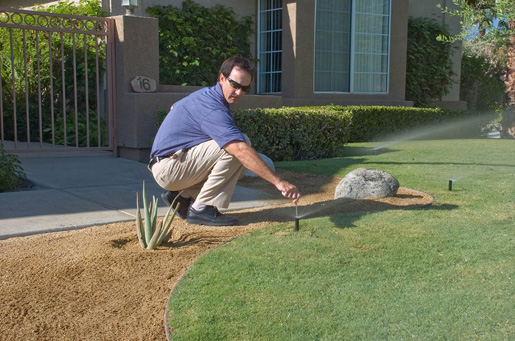 Installed and operated correctly, an automatic sprinkler system is the ideal way to irrigate lawns.
Installing Your Irrigation System
At last, you have decided on your irrigation zones. Now you need to decide where you (or your contractor) will install the controllers and valves. If you are interviewing contractors and they do not fully understand the following questions, consider finding another contractor who does understand.
- Where is the water source most easily accessible, yet the irrigation system will be unobtrusive?
- What is the pipe size at that point?
- Where is the electric power source for any automatic controller?
- Where is the most easily accessible yet unobtrusive site for automatic controller and the control valves?
Before going to purchase your equipment, make a list of the required supplies. If your irrigation plan is neatly drawn to scale, the irrigation equipment supplier should be willing to help compile a list of what you’ll need, along with an estimated price.
The hardest part of installing an irrigation system is the physical digging of holes where all the pipes and valves will go. Start with the mainline. The mainline leads from the water source to a location where you will be placing your valves. As mentioned, the mainline is generally constructed of PVC pipe rather than polyethylene because it is more resistant to pressure changes. As you leave the water source and begin the mainline, install the emergency shut-off and the backflow preventer. You can also install a single filter for the whole system at this point.
Depending on your design, you may have a short or long mainline. You may even have several mainlines to different zones. Keep in mind that if you use an automatic controller, you will also need to run the control wires to the automatic valves.
Once your mainline trench is dug to where your zone control valves will be located, lay in the mainline. Next, install the valves and all the associated devices you will need for each zone line. This is occasionally referred to as the valve assembly.
Each zone will need a filter if you have not already installed one. Next step is to install the control valve. The control valve can be automatic or manual. If automatic, it is linked by a low voltage wire to the automatic controller.
Immediately after the control valve, install a pressure regulator. As an option, you can install a pressure gauge after the regulator.
If your zonelines are constructed of polyethylene, you must install an adapter that links the pressure regulator to the zoneline. This device permits easy disconnect for any necessary repairs.
Now that your valve assembly is complete, you can begin to run the zone lines to where they are needed.
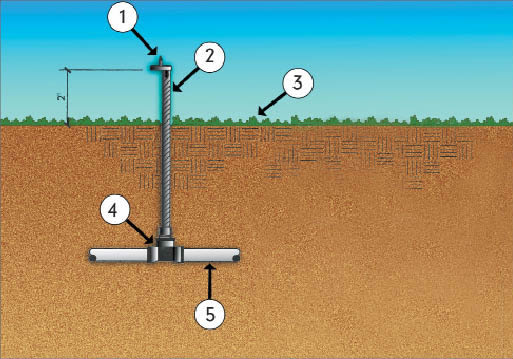 Drip Emitter Assembly
1. Drip Emitter, 2. Poly Flex Rise, 3. Finish Grade, 4. PVC Fitting (SxS x 1/2" FIPT), 5. PVC Pipe
Microirrigation (Drip) Systems
Professional-quality landscape microirrigation equipment was developed initially for agricultural use. Coachella Valley farmers have been among the world leaders in developing and using microirrigation techniques. Homeowners in the Coachella Valley benefit by having easy access to several irrigation speciality stores. These stores are excellent sources for equipment, as well as advice. Irrigation professionals are available to suggest problem-solving steps and provide expert guidance.
For commercial applications, irrigation systems must be strongly constructed, resistant to vandals, hidden from view, locked, and must operate with a minimum of supervision. Home systems need not be so heavily constructed. For optimal, long-term survival of any irrigation system, quarterly maintenance is necessary. This maintenance schedule is easy to remember. Often, it is performed at the same time when automatic timers are adjusted for the change in water need as the seasons and temperatures change.
Installation Tips
Polyethylene pipe will have compression fittings that grip the pipe from the outside. They can be admittedly difficult to compress into place. Never use lubricant to install the compression fittings! If necessary, you may warm the polyethylene pipe in hot sun or with a heat gun or hair dryer to make the fittings easier to install.
The older style “insert fittings” should not be used. They grip the hose on the inside and can come loose and leak with fluctuating pressure or summer heat.
Zone line should be run around the outside perimeter of all the plants served by that zone. From the polyethylene pipe to the plants, you will then install microtube(s). A drip emitter is placed at the end of each piece of microtube. The microtube is connected to the polyethylene pipe with a barbed connector.
Make a hole in the zone line for this connection using a punch, a special tool available where you purchased the irrigation supplies. You can cut a hole with a knife or icepick, but if the hole is too large it will leak. If you have a leak, your only option is to cut out that section of hose and replace it with another section, connecting the replacement pipe with compression fittings.
Standard installation will have at least one emitter at each plant. Trees will have three or more emitters, depending on size and water requirements. The goal should be to moisten at least 50 percent of the soil volume within the plant’s drip line.
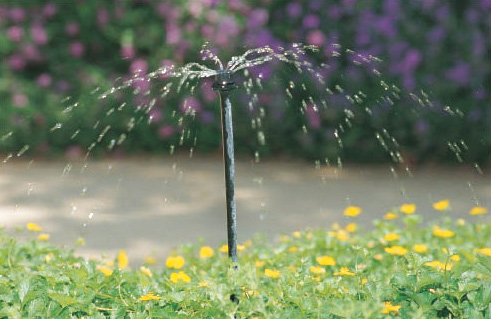 It's best to Irrigate plants such as ground covers so that water is applied above the foliage, allowing coverage to be more uniform over the planting area. This microbubbler is elevated to provide an even application of water.
A plant’s drip line is not the same as an irrigation drip line. The plant drip line marks an imaginary area around the outer perimeter of the plant where rain would drip off of the leaves. It is here that the plant’s feeder roots, which absorb water and nutrients, are located.
For healthy trees and shrubs that will resist being blown over by the wind, encourage wide rooting by placing emitters at the plant’s drip line. Because plants are continuously growing and increasing in size, you will need to periodically adjust the location of the drip emitters, as well as add more emitters.
With a zone line well away from the base of your large plants and with long microtubes, it is simple to move emitters as plants grow. Planning for future growth is important.
Luckily, you can connect microtubing to the polyethylene pipe as many times as you want. Because drip emitters release water slowly, decreased water flow is not an issue. The only issue is that the length of each microtube should be less than 10 to 12 feet.
Frequency of watering will depend on soil type and weather conditions. See Plants and Their Day-to-Day Water Needs.
Drip emitters usually come in 0.5, 1 or 2 gallons or more per hour (GPH) sizes. The variety of plant sizes, water needs, soil types and growing conditions can make selecting emitter sizes confusing. Plants growing beneath trees or in the shade of a structure will need less water than for the same plant species in an exposed location. However, many plants that prefer shade are actually very high water users, and may even require more water than the trees providing the shade.
Because of the big difference in the comparative water requirements of small shrubs and large trees, they should be placed on separate zones (valve circuits). Mid-sized plants generally can share any zone available, by adjusting the number and size in GPH of the emitters that provide their water.
Emitter size and placement also depends on soil type. Sandy soils drain so rapidly that water moves very little horizontally (from side to side) in the soil. Emitters must be spaced closer together in sandy soils to provide sufficient coverage of the root zone. If the area isn't windy, microspray heads may be more efficient than drip heads in such soils.
Fine-textured (clay) soils allow drip emitters to soak wider areas, reducing the number of emitters needed. However, water spreads slowly downward through clay soils, so delivery time should be increased.
On slopes, place emitters uphill 12 to 18 inches from the drip line of the plant. This way water flows down toward the plant to provide more adequate coverage.
Often, many different plant types are planted close together in a home landscape. Some need more moisture than their neighbors. Drip emitters with different flow rates can be used at the same operating pressure to meet individual plant needs. Multiple outlet emitters also can be installed to apply more water to large trees or shrubs.
Emitter example: Two shrubs of similar size are planted on the same zone. Shrub A is a high-water user. It gets 5 emitters that flow 1 GPH. Shrub B is a low-water user. It gets 3 emitters that flow at 1/2 GPH. The system operates for 6 hours once a week. Shrub A (high water) has 30 gallons to sustain it for the coming week. Shrub B (low water) has 9 gallons to sustain it.
Keep in mind that this example is for established plants, not newly planted ones. Also note that all plants in the same zone (the same station) will be irrigated for the same amount of time.
When including lawn in your landscape, try to keep the design simple. This will make it easier to water, mow and trim edges efficiently.
Specialized Irrigation Systems
Vegetable Gardens—A vegetable garden should be on its own irrigation zone. Drip irrigation is an option, but speciality devices such as in-line drippers, multi-heads, porous hose or irrigation tape can also be used. Check your garden daily when the system is first installed to be certain plants are receiving adequate moisture. Once the summer garden is established, watering may be required only two to three times per week, depending on soil type and the garden’s exposure.
Flowerbeds—Drip irrigation for special situations such as flowerbeds can be challenging. This is where specialty drip devices are of value, much the same as with vegetable gardens. Look to in-line drippers, multi-heads, porous hose, irrigation tape or bubblers to supply the varied water application needs of these plants.
Ground Covers—If a desert-adapted ground cover is used, irrigation is simple. Due to low water needs, well spaced drip emitters will be ample as long as the run time evenly moistens the soil covered by the ground cover.
If high-water use plants are installed, the homeowner may opt to use specialty devices such as in-line drippers, multi-heads, porous hose, irrigation tape or bubblers.
Irrigating a Grass Lawn—A grass lawn should be on its own zone. The control valve must be an atmospheric breaker valve. The pipe for the entire zone should be rigid PVC pipe.
An irrigation system that sprinkles water from overhead is usually the right choice for lawn irrigation. Depending on the size and shape of the lawn, install either pop-up sprinklers or pop-up rotors.
Plan your system so the entire surface of the lawn is watered without overspraying any areas, or leaving areas dry. Avoid overspray on buildings or fences, which can cause extensive damage over time. Also avoid spraying surrounding landscape plants where fungal diseases or water spotting will become a problem.
When the weather turns cool, homeowners often neglect watering Bermudagrass lawns. Never allow them to become bone dry, even if they are not overseeded. If winter rains are absent, irrigate at least once or twice a month. Doing so will allow the lawn to recover more promptly in spring.
Retrofitting an Irrigation System
Retrofitting an irrigation system usually occurs when homeowners move from lawn sprinklers or bubblers to drip irrigation. Most of the time, existing PVC piping can be utilized for the new system.
Check operation of existing valves. These valves may need to be replaced with smaller valves designed for reduced flows.
Drippers may be installed on existing PVC piping and irrigation-head risers by using a multi-head fitting. This allows you to connect 6, 8, or 12 lines of microtubing (with drip emitters on each microtube) from a single location cut into the PVC. If connecting multiheads to existing PVC is not an option in your landscape, you’ll have to install new polyethylene zone lines.
Polyethylene pipe can be attached to PVC pipe with a special compression adapter. Polyethylene can be run from existing valves and placed where necessary to water plants in each zone. For best landscape appearance and longevity of the polyethylene pipe, bury it a few inches below the soil surface.
A drip-irrigation controller must be capable of long cycle watering—from 1 to 6 hours. If it is electronic, it is probably adequate for the new system. Electro-mechanical controllers usually have 30- to 60-minute maximum run times per zone. If drip irrigation will be installed on an existing electro-mechanical station, it is best to replace it with an electronic weather-based controller.
Maintaining and Troubleshooting Your Irrigation System
When plants wilt or die, the cause may be a malfunction of the irrigation system. Regular maintenance of the system can usually prevent this. When problems occur, rational, systematic troubleshooting techniques can identify problems so you can make repairs.
Maintenance and repairs are easier if you’ve planned the initial installation carefully. Controller wiring should be arranged so all valves operate in sequence as you walk around the house. Some controllers have an optional test cycle schedule built in, which is typically two to five minute per zone.
Electrical problems can prove to be troublesome. Again, preventing problems with a quality installation is the best policy. Wire connectors at automatic control valves must be properly waterproofed or, better yet, use all UL approved connectors made for direct burial.
Controllers should be on their own circuit breaker to prevent loss of power if another appliance malfunctions. Heat causes a lot of controller failure. To reduce controller failure caused by heat, position them out of direct sun—especially afternoon sun. Install away from air conditioning units, which produce heat. Replace backup batteries in time clocks at the beginning of each summer.
Checking a Lawn Irrigation System
To find out if water is being applied evenly throughout the lawn area, perform this simple test. First, set several empty coffee cans, tuna cans or other straight-sided containers on the lawn. Place in a grid pattern between sprinklers. Run spray head sprinklers for 15 minutes; run rotor head sprinklers for 30 minutes. After this allotted time, use a ruler to measure and record the depth of water collected in each container. By using containers that are all the same size (with identical surface areas), water volume for separate areas around the lawn can be compared by pouring them into a kitchen measuring cup. If there is a difference of more than 20 percent between maximum and minimum, identify problem spots and adjust sprinkler head flow rates.
Most spray head irrigation systems spaced 12 to 15 feet apart should accumulate about 1/2 inch of water in 15 minutes of operation. Most irrigation systems using larger rotor sprinklers spaced 25 to 40 feet apart will accumulate about 1/4-inch of water in 30 minutes.
The lawn irrigation chart is for established Bermudagrass lawns, watered during the cooler hours of the day. If you overseed with winter ryegrass in fall, increase water to meet the germination needs of the rye.
The irrigation chart assumes normal weather conditions and sprinkler uniformity. Irrigation time should be increased when temperatures are above normal or conditions are windy, and decreased during rainy periods.
Preventative Maintenance of Lawn Systems
Operate the test cycle manually from the controller after each mowing to check for damaged or malfunctioning sprinkler heads.
Heads must pop up to clear grass and pop down at the end of the cycle. If they do not, debris is clogging them or there is another problem. Clean and flush the heads.
Look for clogs, rotors not turning, heads tilted out of alignment, or part-circle heads twisted out of horizontal alignment. Also check for head-to-head sprinkler coverage. Each sprinkler should throw water to just reach the area covered by the adjoining sprinkler. If it is coming up short, it could be caused by a major loss of pressure due to a broken head or pipe. This will need immediate repair. A broken sprinkler head can waste at least 500 gallons of water a week and continue to cause other sprinklers on the system to malfunction.
A "double swing" joint installed on sprinkler heads usually prevents major damage to the installation. The best time to include the joint is when the system is installed. To make a double swing joint, lateral tees and ells are installed at 90 degrees to vertical and two-threaded street ells are installed before installing the sprinkler riser. Flexible risers can be installed on existing systems.
e—Be aware of possible liability problems caused by injuries from improperly placed sprinkler heads. Be sure all heads are below grade of adjacent walkways, but only slightly so.
If lawns slope toward a structure or sprinklers throw water onto a structure, moisture can enter the wall, causing severe damage. Regrade planted areas so water drains away from structures. Replace or redirect errant sprinklers.
Preventative Maintenance of Irrigation Systems
Once per quarter, when you change the controller program to reflect the seasonal change, operate the test cycle. It allows you to see if each valve is coming on and shutting off properly. Run the system long enough to check all water delivery devices.
Start at the beginning of the system with a check of each of the following:
Water Meter—Check the flow routinely when the irrigation system is running. Changes in flow rate will warn of problems. Unusually fast flow is indicative of a leak. An abnormally slow flow indicates clogged filters or emitters. Some high-tech systems use electronic flow meters connected to controllers to automatically shut off a system or valve when the flow rate goes outside preset limits. When this happens, an error message is left for the user.
Emergency Shut-off—Operate this valve to be sure it still works properly. By testing it once per quarter chances are it will not be frozen open when you need it to close.
Filters—Although quarterly cleaning is a must, clean them more often if it is necessary to keep the system flowing without pressure loss.
Controller—Check regularly that the correct time and day of week are displayed.
Controller Program—Check and adjust every couple of weeks during spring and fall and every month or two during summer as needed. Keep pace with changing weather conditions unless a soil-moisture sensor override system or weather-based controller is used.
If the controller is electronic, determine if it is running the personalized program you set it to run, instead of the default program. If the default program is running, check the battery backup system and replace batteries as needed. You will then have to reprogram the controller as well.
Irrigation Schedule—For heavy water users, determine if at least 80 percent of daily evapotranspiration (ET) requirements are being met. Low-water use plants may require only 40 to 60 percent of daily ET, while lawns in late spring or early summer may be much higher. See irrigation guide for landscape plants, and irrigation guide for lawns.
Irrigation Timing—Operate irrigation systems during the coolest time of the day in summer and early enough in the day in winter so plant leaves dry before dark.
Valves—Check for flow. Be sure the optional manual override on automatic valves is not frozen open or shut.
Pressure Gauge or Schrader Test Valve—This optional piece of equipment is set at the end of a micro-irrigation system to diagnose leak or pressure regulator problems.
Drip System Lines—Flush lines quarterly by removing all of the end caps and running the system for about two minutes. Put the end caps in your pocket when you remove them so they won’t be washed away by the flow. Likewise, flush lines after breaks are repaired.
Emitters—Check for clogs or lost emitters. Look for any leaks caused by damaged pipe or microtubing.
Bubblers—Check for proper flow and any leaks.
Runoff—During a normal irrigation cycle, check for water runoff. If water is running off, divide application into two or more cycles during the day separated by an hour of "soak-in time."
A single dry spot that suddenly appears in the lawn is probably the result of one sprinkler failing. For example, one rotor head is not turning or there is a clogged nozzle.
Diagnosing Irrigation Problems
Valves fail to operate. This may happen after you tested the system and you forgot to return the automatic controller function switch to the “run” position. Professionals and amateurs alike make this error surprisingly often.
In electronic systems, the second-most common reason the valves do not operate is a program set incorrectly. Examples include when the day is set to “off,” the “skip days” is incorrectly set or the “start time” is set to off.
Valve failure can be caused by loose wires on the valve or controller. Check wire connections and tighten them.
Sometimes the solenoid in the valve becomes defective. Test with a multimeter or volt meter. If it is bad, you may be able to replace the solenoid, or replace the entire valve.
Valves open at the wrong times. This is due to incorrect programming of the automatic controller. It may be as simple as resetting the a.m. and p.m. setting of the clock.
No display on the electronic controller. Power to the controller has been lost. Check the breaker. If it is OK, turn the breaker off and check controller wiring to the house current.
Dry spots between sprinkler heads. Usually the result of a clogged or broken spray head. A broken riser or pipe below the riser can also be the problem, but not as often. Unclog the sprinkler head or repair the break.
Occasionally, dry spots are the result of low water pressure. Dry spots a few feet from rotor heads with green interlinking rings farther out between heads or, in the case of spray heads, green around the head and dry in between, is typical of low pressure. Clean the filter to fix.
Dry spots can be caused by misaligned spray heads. Check to see if they are perpendicular to the surface they are watering.